


You open your writing folder, and the manuscript is gone. Or Word opens yesterday’s draft without the chapter you finished last night. If you’re trying to recover deleted Word manuscript drafts, start with copies you may already have.
We recommend checking the folders and saved versions first, then trying crash recovery or a drive scan only if those checks fail.
Check the Manuscript Before You Try to Recover It
Look in Word’s Recent list, then search your writing folder by title and modification date. If you switch between a laptop and desktop, check both devices. Cloud sync conflicts can leave an extra copy in a different folder or under a modified filename; there is no single naming pattern that every service uses.
If the document opens but a chapter is missing, save a copy before changing anything. If the entire file disappeared from a local drive, avoid downloading or installing software there. New files could overwrite data you still need.
Five Ways to Recover a Lost Word Manuscript
Start with the place where you last saved the file. The right method depends on whether you lost a whole document, a saved revision, or work from a crash.
Method 1: Check Deleted Files and Cloud Copies
Check the Recycle Bin or Trash before you install anything. You can often recover deleted Word documents from these folders without scanning a drive.
Windows: Open the Recycle Bin, right-click the manuscript, and choose Restore. Windows returns it to its original folder.
Mac: Open Trash, Control-click the manuscript, and choose Put Back. Check that the document opens afterward.
If neither folder has it, search File Explorer or Finder for part of the title. Try *.docx if you changed the filename. On a Mac, choose This Mac, so Finder searches beyond the open folder.
OneDrive has its own online Recycle Bin. Sign in with the Microsoft account you used in Word to restore deleted Word files that are still within the retention period. Personal accounts usually keep deleted items for 30 days; work and school accounts generally keep them for up to 93 days unless an administrator changes the policy. If you used iCloud Drive, check Recently Deleted for eligible files from the past 30 days.
A USB stick needs different handling. Stop copying files to it and do not accept a prompt to format it. If you use Windows, consult this article on USB recovery before you run a scan; it distinguishes simple deletion from problems with the drive. Also check the computer where you last edited the manuscript for a local copy.
Once the document returns, read the end of the latest chapter. If the file is complete but some revisions are missing, Version History is the better next stop.
Method 2: Restore Missing Chapters With Version History
A manuscript can still open even after you accidentally replace a chapter or save an unwanted edit. In that case, look for an earlier version instead of a deleted file. Version History works with documents kept in supported OneDrive or SharePoint locations.
- Open the manuscript in Word and select File > Info > Version History, where available. You can also open Version History from the file in OneDrive.
- Choose a version from before the missing scene disappeared. Open it and check the passage you need.
- Copy the missing text into a separate document. Compare both drafts before replacing the current one.
If the option is missing in Word, confirm that the manuscript is saved in OneDrive or SharePoint. For the browser controls, use Microsoft’s version history steps. AutoSave helps save cloud edits, but switching it off doesn’t erase existing versions.
You can recover lost Word document revisions through Version History if Word saved an earlier copy. It won’t bring back text you never saved, though. For a crash, check AutoRecover next.
Method 3: Look for Work Word Saved Before a Crash
A laptop battery dies halfway through a scene. When you restart Word, the manuscript is still there, but the latest pages are not. AutoRecover may have saved part of that session.
Reopen Word first. If you see the Document Recovery pane, open the newest relevant copy and save it under a different name. On Windows, you can also use File > Info > Manage Document > Recover Unsaved Documents. Check the last few lines before deciding you have the right draft.
On Windows, open File > Options > Save to find Word’s AutoRecover location. The recovery files may use the .asd extension. On a Mac, reopen Word first. If nothing appears, open Finder, choose Go > Go to Folder, and enter ~/Library/Containers/com.Microsoft.Word/Data/Library/Preferences/AutoRecovery/. If the folder is missing, check Word > Preferences > File Locations for your installation’s AutoRecover location.
If Word finds no draft when you reopen it, check Microsoft’s Word recovery instructions for other available recovery locations. Word may delete its AutoRecover copy if you close a document normally and choose Don’t Save.
If no recent recovery file exists, an older backup may still hold most of your writing.
Method 4: Find a Draft in Your Backups
An editor’s attachment or a Time Machine backup may hold the missing chapters even when Word cannot. You do not need the newest file to save yourself hours of rewriting.
- Windows File History: Open the original folder, then inspect Properties > Previous Versions. On Windows 11, you can also reach older context-menu items through Show more options. File History must have been set up before the loss.
- Mac Time Machine: Open the manuscript folder in Finder, enter Time Machine, and review backups from before the file disappeared. Restore a copy without overwriting a newer draft.
- Shared drafts: Search email attachments, exported PDFs, and folders shared with an editor or beta reader. Compare the ending of each copy before you merge chapters.
For supported Word for Windows setups, search for *.wbk as well. Word can create a backup copy when the Always create backup copy option was enabled beforehand. If you find one, open it in Word and save a separate .docx file.
If the document was permanently deleted and you have no usable copy, only then consider a scan of the original drive.
Method 5: Scan the Drive for a Deleted Document
A drive scan looks for deleted data that has not been overwritten. It cannot undo changes you saved inside an existing document. On an SSD, TRIM may have already made the old data unavailable.
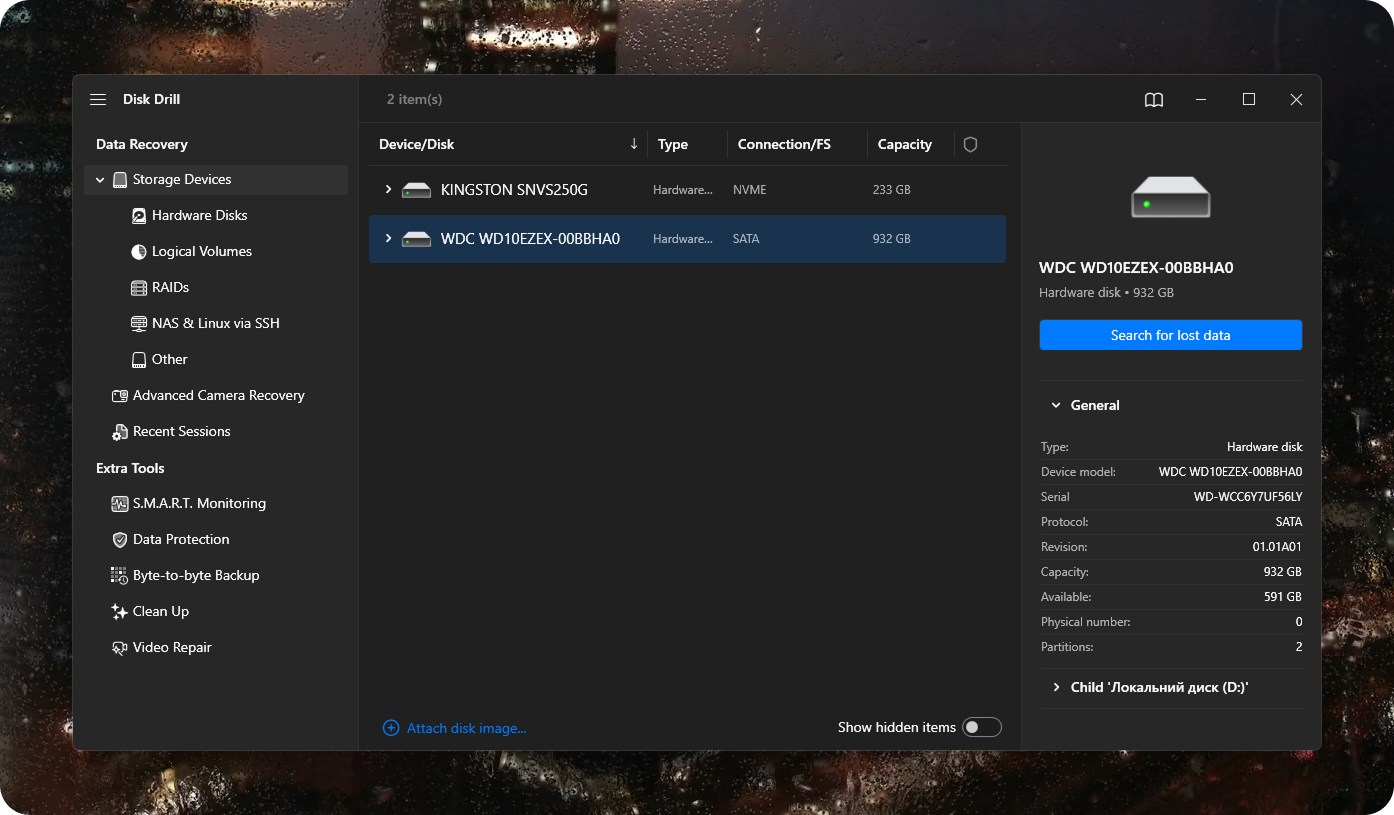
If the manuscript is missing from your backups and deleted-files folders, scan the original drive with data recovery software such as Disk Drill. Its visual scanner can help you find Word documents and preview files before recovery.
- Select the drive where you last saved the manuscript and click Search for lost data.
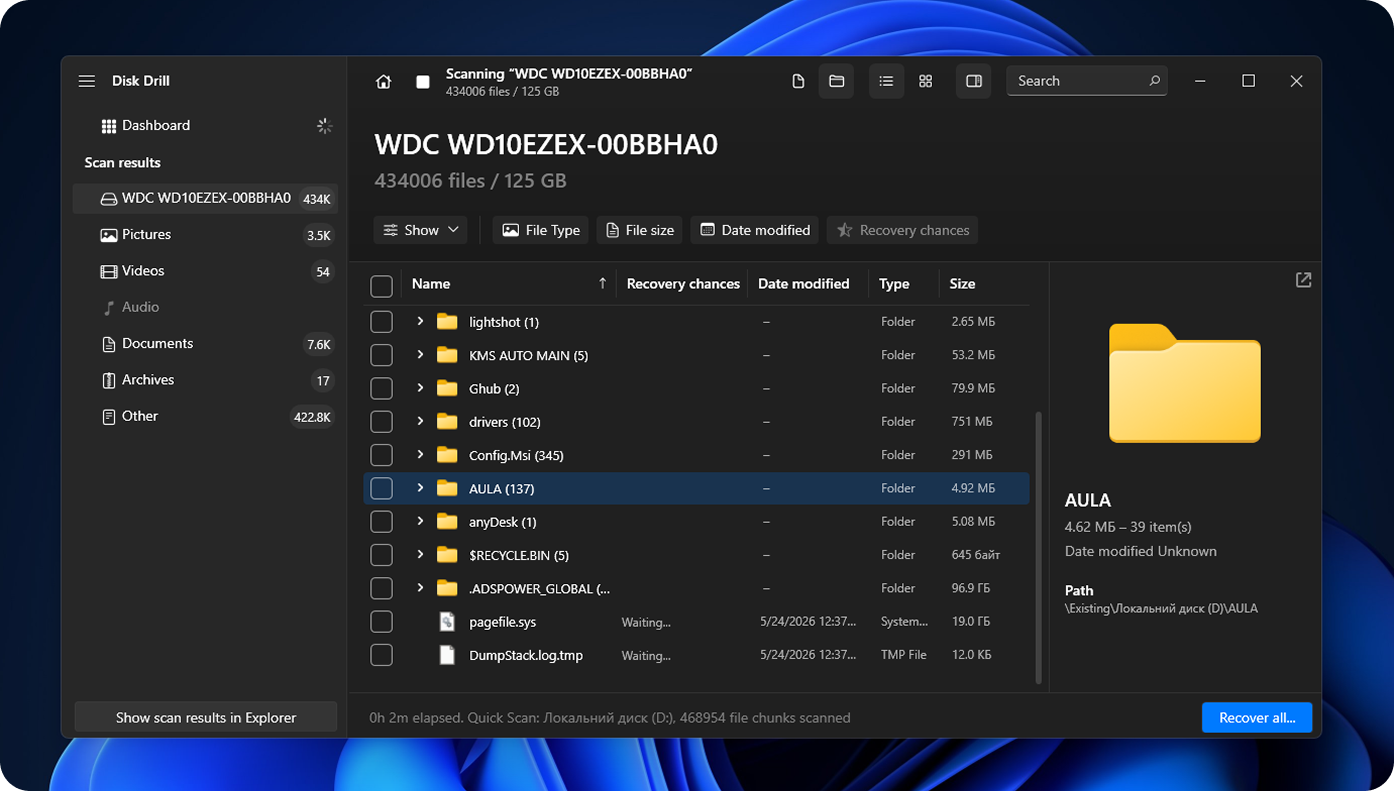
- Open Review found items, choose Documents, and use the search field to look for .docx or .doc files. Preview promising results to see whether the chapter text is intact.
- Select the file, click Recover, and save it to a different physical drive. Open the recovered document in Word before editing it.
On Windows, Microsoft’s free Windows File Recovery provides a command-line alternative. Install it from the Microsoft Store and use a separate destination drive. For a recent deletion on healthy NTFS storage, the command winfr C: E: /regular /n *.docx searches C: and saves results to E:. Replace the drive letters with your own.
Full data recovery is not guaranteed. If the drive clicks or disconnects repeatedly, stop using it and consult data recovery experts. If your file still exists but Word cannot open it, Word may repair corrupted Word files with its built-in Open and Repair feature. Work on a copy, then go to File > Open > Browse. Select the file, click the arrow beside Open, and choose Open and Repair.
Choose the Right Recovery Method
A quick comparison can help you decide whether you are looking for an existing copy, unsaved changes, or deleted data.
|
What you can still access |
Start here |
Watch out for |
|
The document is missing |
Recycle Bin, Trash, or cloud deleted files |
Retention limits and wrong cloud accounts |
|
The document opens, but text is missing |
Version History |
Restoring an old copy may replace newer edits |
|
Word closed before you saved |
Document Recovery or AutoRecover |
The latest paragraphs may not be present |
|
An older copy may exist |
File History, Time Machine, or shared drafts |
Check the last chapter before using it |
|
No copies remain |
A recovery scan of the original drive |
TRIM, overwriting, and saving back to the same disk |
Final Words
After you recover a draft, check the middle chapters and the ending, not just the first page. Some documents open with missing text or damaged formatting. Work on a copy while you check what survived.
Before your next writing session, make sure AutoSave works for your OneDrive manuscript and keep a second backup outside the synced folder; back up the entire project, including outlines, research notes, and editor comments. Open a backup now and then to make sure it actually contains your latest work.